Monday, February 18, 2013

Bucket List and Tiles

There are couple of things that I do desire to do before I pass on.  One of those things has come to pass.  My name is now on a patent (it is pending right now). I know don't count your chickens before they are hatched but this is close enough.
I came up with the idea for an integrated socket to attach a ball bearing glide to a back panel.  It doesn't seem like much but the other methods are screwing on sockets and then sliding the glide into the socket.  This was a decent labor savings for the company.  My name is on the patent but my employer owns it.

Tile boards
I did not put on the picture, paint or frame, I cut and grooved the piece the picture goes on to.  They came out really nice.  Who would have thought that MDF could look so nice.  If you are interested I can make the boards.  I do not know if the person I made them for sells them. If you would like more information please let me know.  I can make them any size and any grooving pattern


Saturday, January 26, 2013

A Box and a Clock

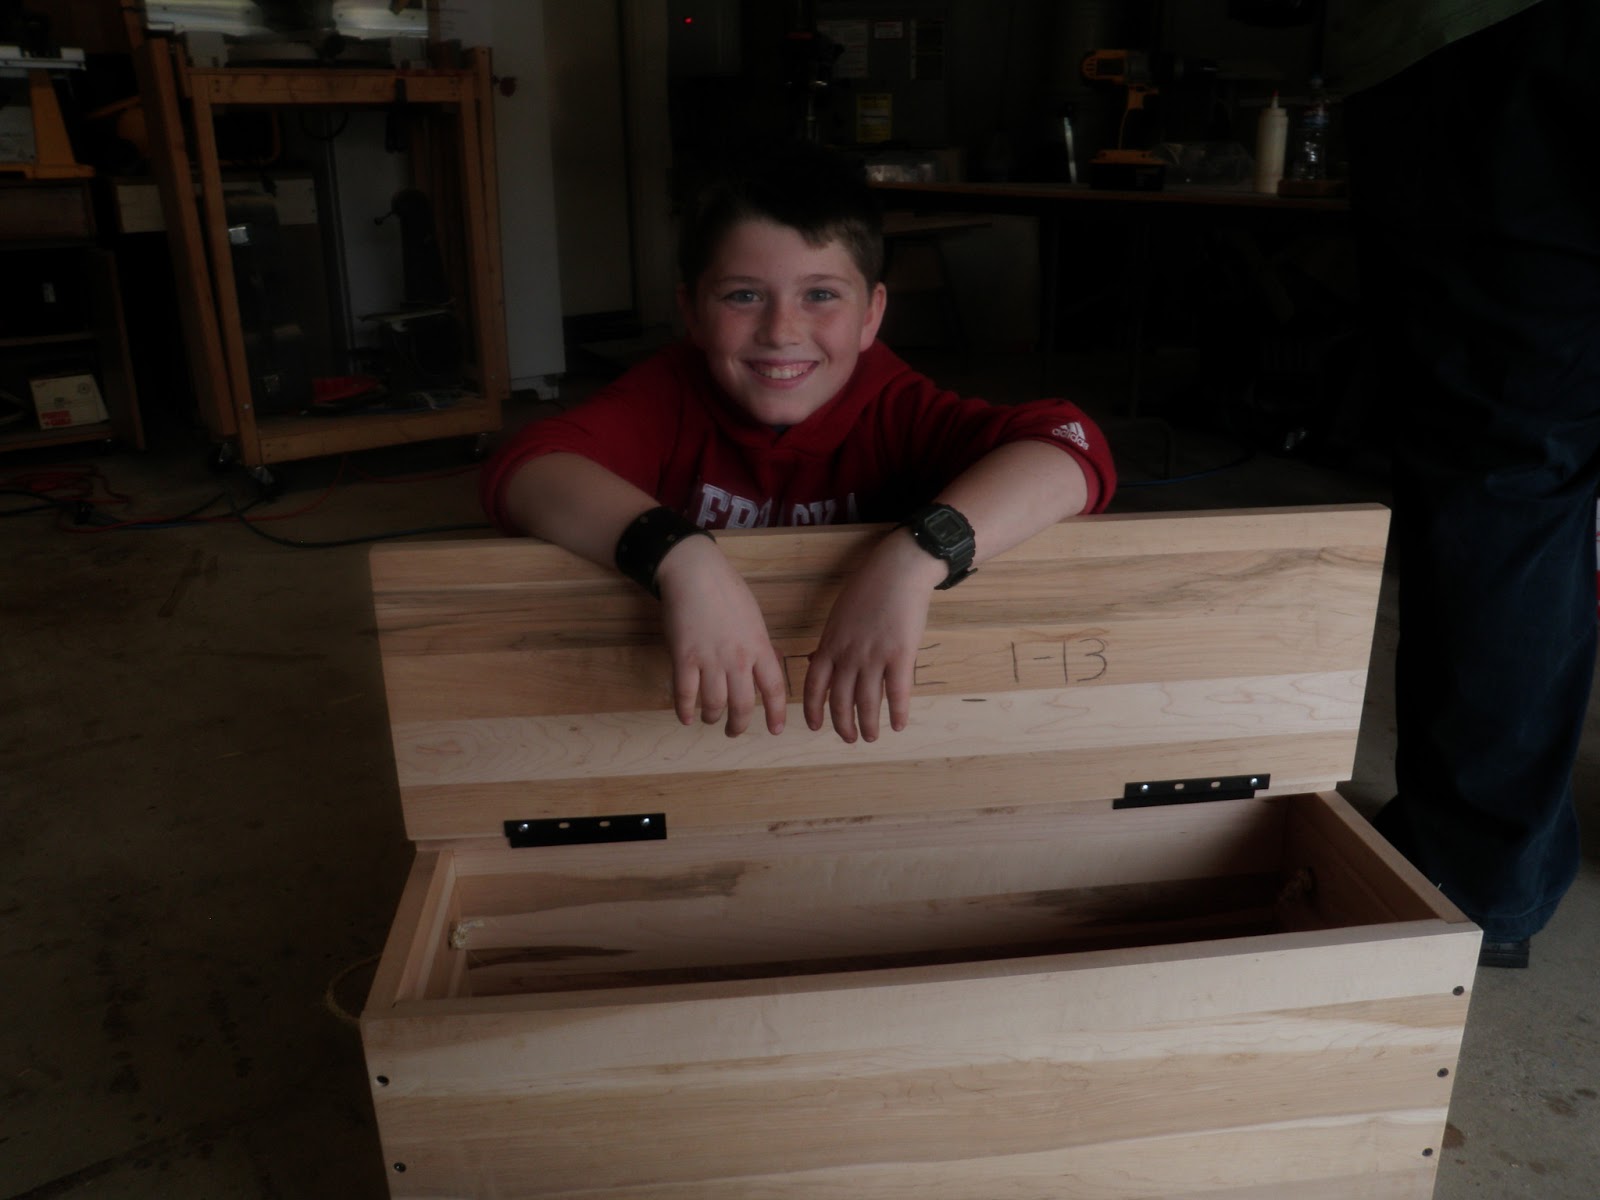
Today I had the experience of helping the 11-year old scouts make camping boxes.  If all my projects went this smooth it would be great.  The only problem we had was snapping the the heads off a couple of screws.  These were the nicest camping boxes ever made, and that is an understatement.  The boxes were made out of solid butcher block maple.  Hopefully this is what they got out of this experience:
  • Understanding how to develop a project, sketch it out and cost the materials.
  • Know how to use basic hand power tools.
  • Know safety for oneself and other with tools.
  • Knowing that they can accomplish a task if they want to.
  • How to drive in a nail with a hammer.
All the parts were cut to size and grooved for an easier assembly before today.  The scouts had to bore holes for rope handles using a drill press.  Using a cordless drill, they had to pre-drill and countersink all the holes for the screws.  They also had to mark and attach inset hinges for the lid.  They also had to burn their names in the lid.  That was the only place were we had injuries. It was a fun project and we completed seven boxes.  All the wood was donated by RSI Home products.
 I hope the parents that came also had an enjoyable time and learned something too.

This is probably my one and only clock that I will make.  The face was $13 and it is only 1 3/8 in diameter!  It was a tough scroll saw job but it came out nice.  I need a pen to go with it, so I need a lathe.

My photography teacher would kill me for this picture.  If you look at all watch pictures, the hands are at 10 and 2.  Mine are at 8 and 4.  The hands make a sad face not a happy face.  Little tricks learned.

If the words did not come out well it says "Squeezed for time."  I do not know where I found the pattern.  It was free off a website.

Thursday, December 27, 2012

New puzzles and a new year

I finished a couple of new puzzles.The first is a motorcycle.  I realized is it is very hard to cut straight lines and oak is not my favorite to scroll saw with.  The blade is thin and oak does not have a very consistent density so the blade likes to bend.  This makes it so the puzzle does not come apart.  The first was in oak and it failed so this one is out of alder.

The second is a star that will never come apart because it will be a pain to put back together.  Each point is almost cut the same.  I had a hard time putting it together when I was cutting out each piece.

The last is a puzzle I made for my wife for Christmas.  Yes, she like pigs and I found the pattern off of the Internet.

This past year is one where I never had enough time.  I didn't get some of the things I wanted done and several unfinished projects still sit on the shelf.  However I never have enough time and there are always new projects that keep coming up.  I am satisfied with the things I was able to accomplish.  I have a couple of furniture pieces I love. My kids have not destroyed the bed yet, and they have tried.  I still have two may poles that I wanted to finish along with a couple of trucks and planes.  I love the construction equipment that I have made so far.  I just wish the kids were old enough so I do not have to worry about them destroying it when they play with it.

This year was a lot about puzzles.  I will be focusing on toys again in the future will a little bit of a twist.  I am looking to buy a lathe, not sure where I am going to put it.  So what does than mean, I am not going to be giving away as many toys this year and my prices will start to reflect labor.  I am thinking I will try the craft show route this year.  This should be a good year and at least I will learn a little about being in business.  If you would like to just donate to my lathe fund, check or cash is fine.

Thursday, November 29, 2012

Rocker template

I promised I would post how I made the rockers on the kids rocking chair.  Basically it is an arch that I cut out with a router and circle cutting jig.  I bored holes for clamps.  There are three important things to remember with this jig:
1. Put tape, either packing or masking, on the top of the fixture.  The thin strips are then put on top of the tape.  This allows you to remove the part once the glue dries. 
2. Have one of the thin strips protude a little more than the others.  This allows for a clean edge to cut off the excess glue and clean up the edges.  Make sure you allow to cut about 1/4-3/8" off the width for this.  I also use the top piece to be my larger/off set piece because glue does not drip over the edge.
3. Use plenty of glue.  Once the thin pieces are laminated they can not be re-laminated if they separate.


I used 3/6" thick strips and and laminated five of them together.  They bent just fine.  there was about a 1/4" spring back so this needs to be accounted for in the fixture.

Sunday, November 25, 2012

The Gerbil

This will be the first puzzle that I created.  I stole the basic design from a picture on the web and then put the letters in.  If you would like to take the design, please do.  Copy the picture and print it out.  Trace the lines with a black pen and enlarge or reduce to the size you want.  This one is about 7" long. 

Sunday, November 4, 2012

A little out of my league

This is not a post about wood working but about my life.  Yesterday I did a 10k trail run in the Chino Hills state park.  It was a little chaotic start because there was at the same time a 50k, marathon, and a half marathon all starting at the same time.  As I was warming up I was looking at the cars in the parking lot.  The bumper stickers and license plate frames told me this was not the same group who do mud runs, color runs, or zombie runs.  These people have ultra marathon finisher (78.6miles), iron man finisher, 100 mile Tahoe finisher. This was a little more extreme then I will take my running.  I have a goal to run a marathon next year, now I am not sure I am going to make it after this 10k.
The run was not my best performance.  I do realize that I cannot compare to my high school and college days but 1:01was not what I was hoping.  This is roughly 10 minute miles.  As for the course, not easy.  There was about 800 feet of elevation gain over the first 2.5 miles and a sharp decent in about 3/4 of mile.  So the climb killed my quads and the decent killed my knees.  When I came off of the decent there was 3 miles of relatively flat and I was in fifth place at the time.  Over the next three miles I fell to ninth, not because I wanted to but because I physically could not run any faster. I tried to pace myself off the people that passed me but could not keep the pace.
I realize I have to do some work on the hills.  I do not have any in my neighborhood so I have to look elsewhere.  My tactic is three miles 3 times a week and stepped mileage on Saturday (plus one mile each week)  Is there any way to improve my speed on road road running or am I going to have to go back to intervals? Can I train for a marathon like this?

Saturday, October 27, 2012

Taking Care of a Baby Doll

One of the Christmas requests I received this year was to make a cradle, high chair and rocking chair.  Here are the three.  Here is the cradle.  I have made a couple of these before to use up some lumber I had laying around.  It is a birch plywood with a walnut stand.  You can read about the original project here.
The high chair came from this blog.  Interesting blog.  Since I built one of her projects I am supose to release her from liability.  What I find interesting is that she is from Alaska and she posts all her plans for anyone to use.  There are some good plans that she has done.  This one is pretty basic.  I changed the joinery a little bit.  I used dowels and biscuits and she used screws and caps.
The chair is made from maple and walnut.  I doweled all the horizontal pieces together and biscuit joined the sides together.  I wanted to dowel the sides together but I used the fixture incorrectly and screwed up a side.  Learned a lesson on that one.  Doweling is not that easy to do.  The neat thing about the chair is the picture below.  This is the seat.  Not very often I get excited about a board that I see and have to have it.  Let me rephrase that.  A board that I see and can afford.  I saw this in the lumber yard and the grain was pronounced and looked great.  I try to make the entire project out of the same or similar board so it matches.  Fortunatly for me all the other parts were cut and I just needed  the seat.  I don't know what I am going to do with the rest of this walnut.
The rocking chair was patterned after the one my grandfather or great-grandfather made for for my mother. I did make some changes but the original construction is all the same  This is another maple and walnut piece.  The center is glued up and all the pieces were cut from that glue up so the grain seams to continue.  I did cut the bottom rail last so the mineral streak does not continue on to that piece.

 Just for your enjoyment, my son in the rocking chair. He is 18 months to give you an idea of the size.
Here is the cool thing about this board.  I lucked into this one.  I was not really looking for this character but after it was finished the tiger stripping came out, pictured below.  Yes I also tried to make this look like it was book end pieces of material between the walnut. 
The only change I did to my grandfathers construction was the rockers.  He put a steeper radius on the the rockers which allows it to rock more.  His rockers were also cut out on a band saw.  I chose to laminate mine with thin strips of wood. This allowed me to make a pattern and it is also stronger.  If I remember I will take a picture of the fixture and my mother's child rocking chair and post them.  Mine do not rock as much for safety reasons and the reason for the larger radius.  It is very easy to have a child rock themselves backwards.