Friday, December 30, 2011

Alien Nativity and First Maypole

As the year comes to an end I was able to finish two nativities.  The first and probably the most simple of the two was the maypole.  I am not quite sure what a maypole is but it came out nice.  The pattern came form Meisel hardware.  It was a lot of scroll saw work.  My mother painted the figures.  I cannot paint so it was nice of her to paint them for me.  They may have looked nice unpainted but I think they would be a little hard to tell which figure was which.
This is the front and back sides.  Below is the reason I fell in love with this project:
It really spins.  I think I would be sick after this ride.  The scroll saw work was relatively straight forward.  The circles are easy to cut out if you know how to do them.  Two basic ways.  One is on a band saw with a fixture and a pivot point.  The other, which I used, is a circle template and a router.  There are off the shelf circle templates that you can buy; save your money and make one.  all you need is a grooving bit, a scrap piece of wood and a bushing guide set.  There are all sorts of plans on the internet to make these.  It is a good jig to have in the garage. 
I did modify the plan slightly.  All the figures are doweled into place.  Dowels are glued into the base and not glued into the figurine,  This makes it so kids can play with it, switch things around or make it completely lopsided.

On to the Alien Nativity.  If you look at this nativity straight on they look like aliens.
 However if they are turned sideways they look fantastic.


This nativity was the reason I purchased my scroll saw.  I purchased the patterns so I had to purchase the power tool.  I started making this set four years ago.  I completely screwed it up.  My table was not square, I was pushing the material through the blade at an angle so the blade was bowing and breaking.  I ended up burning the parts I had cut out.  This is when I started cutting puzzles for practice.  Two years ago I started this set.  If I do say so myself, it is pretty good looking.  It is made out of maple and walnut.  There are some things that I would do better next time but I don't think there will be a next time on this project. 
Interesting little tidbit.  I reduced the patterns on this by 25%.  The wise men were suppose to be three inches taller, they are 12 inches now.  Believe it or not this is not quite done.  I still have another piece to cut out. 


Thursday, November 24, 2011

Twirly Rolling Thingy

Yes that it what it was called.  It was originally designed for my wife's classroom but the district rules stated that every classroom had to have the same furniture so it was never used for what it was designed for.  It was a fantastic design (yes it is one of mine).  There is no unused space.  Two sides will hold books, baskets, toys, or other things.  The other two sides were made as a magazine holder.  The entire thing is on wheels and a lazy suzan so it rolls and spins.  This is the project that started me on my path of pattern making.  This is about a 5 year old project but felt like sharing.

On a side note.  I will not be adding beeswax to my finish.  I was doing some research on the matter and a beekeeper would not suggest using beeswax for the same reason one does not give honey to an infant.  It contains the same pollen and bacteria that honey has. 

I have also been doing some cleaning.  I found several sets of 14" ball bearing glides.  I do have a use for them and would like to get rid of them.  So here is what I am willing to do.  I can make two 4-drawer chest of drawers like the one I did earlier this year. Cost will be $100 per cabinet.  Let me give you a little comparison.  Ikea has a similar unit for the same price.  It is particle board with epoxy drawer glides and frame less.  This will be solid wood and ply wood ball bearing glides, framed and you will not have to put it together.  I will also let you decide the width of the cabinet (within reason).  The height and depth are all ready determined.  Sorry this is for locals or pick up only because it will not be easy to ship.  Please email me if you are interested.

Sunday, November 20, 2011

Finishes

I try to make all my toys with a child safe finish.  In other words if it goes in the mouth it is OK.  Details of my finishes are on the right side of the blog.  This also goes for the wood.  I learned something about my finishes last week.  All of my blocks I put on a coat of mineral oil.  I buy it at Ikea and it is found in the kitchenware section as a wood cutting board oil.  I am really close to running out so I needed to buy more.  I do not live near and Ikea and I heard that I can pick mineral oil up at Walmart.  So I tried and could not find it in housewares.  I asked, I know a guy asking for help is unheard of.  They directed me to the personal hygene section.  I found it on the bottom shelf as a laxative.  I was disturbed.  I hope that I have not turned any one away because I coat the blocks in a natural bowel lubricating oil.  This is pure mineral oil with no fragrances.  If you put a fragrance or other additive it is called baby oil.  It is completely harmless and it is food grade.  So if you are disturbed by this, oh well.

On another note, I am going to try a new finish on the blocks if I can ever get it made.  It is mineral oil with beeswax melted into it.  It makes the mineral oil more of a paste which makes it a little more friendly to use with a toddler running around trying to dump, drink, squirt, or whatever toddlers to with a bottle of stuff.  The problem is the beeswax, it is expensive and not easy to find.  I found it at Micheal's but for $18 a pound.  thank goodness for coupons.

I know it has been a while since I have given away a bucket of blocks.  I have a lot.  I think I am close to three buckets full of unfinished blocks.  I hope to finish them before the Christmas season to give away to families that may be struggling.

Projects are coming along.  I don't know if I will have any finished before the holidays.

Sunday, November 6, 2011

The Latest and current project

Doll cradle
This is the most current project I finished.  The plan was free from Wood Magazine and I had a lot of wood that I needed to get rid of. The plan was not the easiest to follow but  it was mostly template work.  I ended making six of these pendulum cradles; one was a guide, three are complete, and two need to have have the bases built.  I was also using several different woods.  Two were mad out of counter top material.  I did not know that oak butcher block material had two sides.  One really good and one really bad.  The counter top was 1.25" thick so I re-sawed the material in half and planed it down to the correct thickness.  My band saw really was a huge help to me in this project.  The back side was used as the pattern cradle.  I was told not to burn it but make it into a planter.  It is at may parents if any one wants to pick it up.  Two are made from alder, at least that is what I think it is.  It was given to me after the passing of my grandmother. It came from a front room shelving unit that my grandfather built.  I made 4 sewing boxes out of it and then I had enough to make two cradles.  This cradle is the one pictured.  The other two are made out of birch plywood.  I don't know what wood the base is going to be.  This will be one toy that I will not be keeping because I have a crib that I made before I was married modeled after the one my grandfather built for my mother when she was a child.
I was able to successfully use my plug cuter to hide the screw holes.  This was the new technique I learned this time around.  A few things came out of this project: First, assembling parts that do not sit flush to a surface is a pain.  This is the reason there are screws in this project.  Second, it was nice to have a test sample to screw up on.  And third, I really need an oscillating drum sander to sand these larger parts.  I have the modification parts to do this on my drill press but the table is just not big enough.  Fun project probably will not do it again.

Last weekend was the wood working show at the Pomona Fairplex.  It has been a couple of years since my dad and I have been because it seems to keep getting smaller and the deals are not there.  I went to look a band saw class.  I realized that: my band saw is not set up correctly, I have the wrong blades, and it do not use the saw with its blades correctly.  I will not go much further it to this.  I did purchase a couple of things.  I got a wider nozzle for my air brush.  Hopefully I do not have to  thin down my finish.  I also purchased a plate glass sharpening kit.  The thought process is glass is flat so lay wet/dry sand paper of varying grits to use a wet stones.  I tried it out on one of my grandfathers hand plane irons.  They were duller than I thought but I got one of them sharpened.  Now I just have to figure out how to use a hand plane.  That will be for another post.  I did learn something.  Wet sand paper will sick to glass with out adhesive and is much easier to peel off.  If you are in the market for a sharpening stone I would recommend a 1/4" piece of tempered glass and various grits of wet/dry sand paper.  I don't know if I recommend  buying this system. Please note that this sand paper is meant to be wet when used.  I have also heard the using a marble or granite tile also works for the flat surface.

This is the project I have been working on for the past couple of years.  It is not complete yet but here is a sneak peek.


Sunday, October 30, 2011

Tone Drums

I have been working on the tone drums for a while.  I have seen several different versions and it would be easy to make.  But I wanted this pattern so I got it.  This project taught me patience. The tops were supose to be 3/4" thick oak.  I cut the tops out and hit them and all I heard was thud.  Made the boxes.  Then I clamped the tops to the boxes and hit them.  All I heard was thud.  The material was too thick so I planed it down to quarter inch thick and tested again and had the same result.  So I glued everything up and then I could hear the tones.   However I will not know if the thicker wood would sound better and on some of the drums I have some that had a twang to them  I don't know why.
A lesson learned about super balls.  They don't drill well and if drilling in the parting line they split. Here is a link to a project that would take a lot more time and patience then I will ever have Music in the forest.


Sunday, May 1, 2011

The Chest of Drawers

I just finished the baby furniture to complete the kits room last weekend.  I have all ready talked about the bookshelves so I will not bore you with the details of the project.  The chest of drawers was a fun simple project.  I cannot say I am pleased with the finish because I rushed through it but the joinery is fantastic.  I modeled the frame and carcass attachment after what we are moving towards at work.  I used a ½” deep groove to locate the side panels.  I am amazed how much stronger the face frame joint is.  I didn’t even use mechanical fasteners to attach the sides.  In fact the only mechanical fasteners used on this project were:
·         Pocket screws to attach the rails of the face frame to the stiles.
·         Screws for drawer front to drawer box attachment
·         Top to carcass
·         I had no choice to use screws to attach the glides
The carcass I used a stringer method.  It basically is connecting the side panels by running strips of wood between them.  Let’s face it, there is no need for a bottom panel in a chest of drawers.  By itself it is not very strong but when the face frame is added everything squared up nicely.  I had more problems with keeping the drawer boxes square then the carcass.
Drawer boxes are out of cabinet grade birch plywood.  Everything else is out of solid pine.  I attempted to make all the drawer boxes universal and I was good until I put the drawer fronts on.  I was less than a 1/16” off in my spacing so the top drawer does not interchange with the bottom.  So close but I was with in my tolerance.
My wife and I determined we would not add hardware to open the drawers easier.  We all ready have one climber and we don’t need another climbing wall.  We can open the drawers just fine without hardware.  A lot of it is due to the full extension ball bearing glides.  As I was moving it into his room Kyle had fun climbing on the face frame and sitting in the carcass.  It made it very hard to make sure it fit in the closet.  Katie had a few good laughs at the process.

The edit feature in blogger distorted the picture but this is the unit.
No bottom panel but the face frame is deep encapsulated.  Love this design feature

Full extension ball bearing glides.  Drawers come out a full 14" with a 100 pound load rating. We did put Kyle in a drawer.
When I was finishing it a neighbor came over and asked if I made it.  I told her I did and discussed a little about woodworking.  She asked if I would sell it and for how much.  I said I couldn't because this one is for a babies room.  I told her if I would sell it for $150.  That was actually a really good deal considering how much the drawer glides cost (I got a good deal on them).  We now have a six drawer plastic unit.  does any one want it?  Please pick it up.

Sunday, April 10, 2011

Tales of family and pay back

Here are the stories as they were recieved:
Laurel Price:

Well I think that the blocks deserve to stay in the Price Family. After all Katie was a Price.  She has several Price siblings and cousins. One of which is her cousin Sam in South Carolina.  Sam and his beautiful wife Cheryl are expecting their very first baby.  The due date is very close to their 6th anniversary in August.  All Price kids love to play with blocks.  Just think of the stories and construction projects they can make up with blocks from their Cousins Brad and Katie.  Their little one can exchange videos and pictures with their second cousins thus keeping the family connection strong.

That’s my story and I am sticking to it.

Jacqueline Pineda
Why I deserve these blocks:

I love wood.
My kids love wood.
My kids love building things.
My kids don't throw toys, so my house is safe with blocks.
We don't have blocks.
All the kids that come over to play would enjoy them.
I haven't seen Brad in forever and lets face it- this would be a great excuse to see him again.
Cause I'm awesome.

and lastly, ( here is my great story) these blocks would be a great payback. This is a true story.

Once upon a time, there were a group of awesome college girls that loved hanging out. It was getting close to Valentine's Day and they wanted to do something special for the guys in their group. So on the eve of Valentine's Day they gathered at ( we'll call them Kim and Michelle) one of their homes. They spent hours cutting out hearts of many sizes, creating poems for each guy, and baking and decorating cupcakes. By the end of the night, they had cut 3600 hearts for nine guys.

After getting everything into a van, the girls spent the night driving from house to house, quietly sneaking around the front lawn and cars, giving each guy a "heart attack". Many of the hearts were on sticks and they planted them in the lawn. Others they taped to the car and house windows. It was hard not to giggle and get caught.  They left the cupcakes ( wrapped up so bugs wouldn't get them) on the car and hung up their poems by the door. Once, a late night walker stopped and asked them what they were doing, wondering if he needed to call the police. Some of the girls freaked out a little, but they were able to pull it off without incident. It was a great night.

The next morning while at the institute, they had many inquiries as to what they were doing the night before, but they never confessed. They only admitted to having a study group the night before. One of the guys had even woken up late for school and had driven to school with the hearts still on his car! It was a fun night for the girls, and even greater that the guys never really knew the whole truth as to who was involved. 

Mark Yote
I have learned that it is a lot more rewarding to see a smile on a child's face than it is to be paid for a talent one possesses.  If these blocks are awarded to me they will be donated to a local charity

Please only vote once.  You are on the honor system.

Friday, March 25, 2011

The book shelf

We realized that the dry sink was not going to work to hold the kids books anymore.  It was overflowing and Kyle used it to climb on.  Katie found a stack able bear bookshelf in a Meizel Hardware catalog.  She fell in love with it.  On the same page was a similar coat rack with three different animal heads on it.  The coat rack had all the components needed for the shelves accept for the shelves.  So we ordered the coat rack and converted it and it was not all that hard.  For all the math teachers out there I had to use construction geometry to find a couple of arc centers.
Patterns from Meizel Hardware come in 30 x 36 inch sheets so when I get these patterns the first thing I do is copy them so I have a copy to destroy.  So I took it down to staples to get one blue print copy and two 11 x 17 copies of the bodies.  The 11 x 17 copies were $0.20 the blue print copy was $5!  Next time I will copy the sheet on 11 x 17's and tape them together.  It would have been a lot cheaper.  For this reason I destroy the copy and put the cut out patterns on smaller sheets so that I can copy them later for less.
The first task was to make a template of the bodies so they are all the same.  The template worked really well.  I was able to make six pieces the exact same and I can make more.  It was also nice to be able to rough cut the blanks out to reduce the work and force exerted on the router when cutting the bodies to size.
The next part was assembly.  I thought this would be a lot easier then it was.  I didn't realize there were not very many flat edges that I could measure off of to make the rails level and square.  The entire bookshelf is biscuit jointed together.  With some help from my father we figured out how to put the back rail on.
I learned children's books are narrower than I thought so some of the book have to go in a plastic bucket on a shelf.
Just for your viewing pleasure:
He likes his spaghetti-o's

Tuesday, March 15, 2011

I want it but my wife does not

In a recent publication of Meisel Hardware I found this:
  

The link is found here.  I would love to make it, but my wife says no (Room and she thinks it a waste of money). It is only 4 feet tall and 4.5 feet long and the cost of the plan and hardware are in the link.  If any one would like to pay to make it I will be happy to do so.  Do I have any sponsors for this project?

Tuesday, February 15, 2011

The Workman Train

Finished another train.  This one was also featured in the Sacramento train museum.  Sorry the picture is so bad.  If you want to see the picture better copy and paste it into MS Word and play with the bright and contrast buttons.
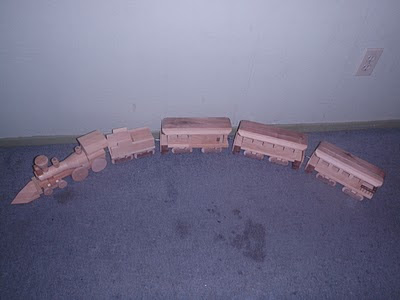
Here is the complete train it was fun and a challenge to build.  It was worked on along with the train in the previous post.
There are a five cars to the train and some are suppose to have moving parts.
The locomotive and tinder are made out of pine.  The boiler is actually made out of cypress.  I was given a turning blank from a co-worker and this seemed to be the project to use it on.  Just a note, I did an initial turning to cut it down to size and get to rough dimensions.  I missed a week of class and in two weeks the wood had warped where I did the plunge cuts.  Lots of sanding on the lathe and the parts remained a little over sized.  It still turned out though.

This is the crane and taker.  The tanker was pretty easy the crane however was the last car finished.  the crane does move but not very well.  I don't know if I could design it better or I just like that it sort of works.

This is the side dump car and the hopper.  The side dump car really works.  The hopper was made on the band saw.
There are a couple of cool features with these trains. The General,  Diesel, and this train are all interchangeable cars.  This means that one of those long trains that blocks traffic for a while can be made out all three of these trains.
On a side note.  if any of the people that I have given blocks to have a block that has this profile to it:

Can I please get it back.  I miss counted how many wheel covers I needed and I am about 16 short.  I may have used the block all up so I don't know if it made it to the scrap block give away.

Sunday, February 13, 2011

The General Train

Well I completed another train.  I thought I was done with trains and this was in the Great Book of Wooden Toys.  I had to use a lathe so I completed the engine in the class I took a while ago.  The cool thing is that I was able to see this train in the Sacramento Train museum last year while I was making it.  
This is the complete train.  It only has four cars and not that hard to make except the engine.  The hardest part was the engine.  The engine looks like a deadly weapon with the cow catcher on it.  

 All the round parts for the engine was made out of a single turning.  Fun to do but it was a trouble to make sure the smoke stack, sand pipe, light and bell all in the same line.  The cow catcher was one of the last parts I made because I needed a bandsaw.  I really enjoy using the bandsaw and it makes the smaller cuts a lot easier.
 There are three passenger cars to this train. These are the baggage and passenger car.  


The final car is the observation deck.  It was a lot of small parts and drilling.

The train is made out of pine and walnut.  There is some birch, maple and beech because they were conveniently the correct size scrap.

Tuesday, February 1, 2011

Christmas Letter - Late

Happy Holidays,
It is that time of year were I get to brag about all the things that the Anderson’s have done this
year. This is a very good year for you because you get to hear more about our son than about the boring
adults. In a nutshell here is the life of the parents.
Katie has retired from the public education system and is now a full time mom. She would have
it no other way. She still plays the piano for the primary at church and occasionally the organ. She is
having fun taking Kyle to various tot programs put on by the city. Oh, I almost forgot, she is expecting
our second child in the beginning of May. It is a boy.
I am still at RSI Home Products designing and building cabinets. If that is not enough wood
working for me I build wooden toys in my spare time. I took on a couple of paying projects to help pay
for my band saw. I can honestly say that I like giving away toys more but it is not very economical. You
can see my projects on my blog sawdustsplinters.blogspot.com.
This year Kyle became quite the little camper. In May he took his first camp out and did very
well. He even was able to pet a snake. So in July we took a trip up to Sequoia Nation Park and spent a
week in a tent. We went with Katie’s brother’s family and her parents also came down to visit while we
were there. We had good food and were amazed how beautiful the forest was. It would have been nice
to have Kyle walking at the time but we let him crawl at every visitor center we stepped in. By the end
of the week he was happy to be home and needed a good bath. We learned that Kyle has a fascination
with streams and waterfalls. He would get so excited when he would hear running water and start
laughing. This also explains why he comes running whenever he hears the bath water even if it is not
his.
Kyle has also become quite the little climber. We are afraid that some day we are going to
find him on top of the refrigerator. We cannot keep him from climbing. A lot of times he climbs on
something to just prove a point, once he has reached his destination he starts laughing and wants to get
down to do it again. We have also learned that he prefers the simple things. We can give him all the
toys in the world and he will play with a box for hours.
Although he was born with TEF, he has not had very many complications with it. When he
turned one we took him to have an esophagram done and they found very little structuring where the
surgery was. Yes he still sounds like a seal sometimes and gets food caught in his throat but he has had
no major problems.
I have to say Kyle is the cutest kid ever. The funny thing is that he is only 18 months and
completely independent. He does not need our help at all he doesn’t want to hold hands but gives the
best hugs ever. He takes after his mother, he likes to be bundled up and warm. He takes after his father
and will not perform on demand and will not smile for the camera. It is fun to see his mind work. He
will sit for a while trying to figure how a toy works and he is so proud when he does. Come and watch
Kyle grow (and the new addition in May) at pigsflyhere.blogspot.com.
Hope this past year has been good to you and the ones you love. We are especially grateful for
this season and the message it brings of peace through our Savior, Jesus Christ.

Love,

The Andersons

This was suppose to go out before Christmas but we are a little late.

On a side note I have a safari puzzle that I would like to give away.  All you will get is a Ziploc bag of pieces so you might want to print off the picture as reference.  All I ask is that you pay for shipping.  It will be for the first person who asks.

Sunday, January 23, 2011

The Barn

Here was last scroll saw project for last year.  I finally finished it.  It is barn with a few animals.


Cow, pig and goat

Horse and sheep


Tractor and cart
I thought I was done with these and Wood Magazine had a dinosaur puzzle in their latest issue.  My discovery on this one was that sanding off the paper pattern will gum up the sand paper.  The patterns are adhered to the wood with spray adhesive.  The spray adhesive attaches to the sand paper and ruins it.

Sunday, January 16, 2011

One scroll saw project

I had two major scroll saw projects I wanted to do last year .  Both of them are puzzles because I thought this was the best way to learn how to use a scroll saw.  One is finally complete, minus the base.  This one is the safari.  The pattern came out of the Wood Magazine.  A while back I purchased some board feet of exotic wood.  It was for these two scroll saw projects.  Here are the pictures.

Zebra and giraffe
Tree and rhino
Lion and elephant
There were some things I learned from this experience.  All I could do is learn because I am new with this tool.  There are several different saw blades for the scroll saw and I used what was the standard blade #5.  after cutting most of the parts out I finally read the instructions and it said to use a #2 blade which is much thinner. I broke several of these blades and went back to a #5. 
Making the two different woods fit together (the trees and mountains), they are  first double sided taped together and cut out together.  Two things can happen with this method:  First the tape does not hold and parts shift during cutting. The second is that the wood can be forced so hard into the blade that bends inside the wood and the parts do fit together.  I had both happen.
The nice thing about a puzzle is that it was had to screw up but I managed to do this several times.
They came together well, just took longer than I expected.  I think I could complete one in a day but it does take a lot of focus. The scroll saw was also time filler projects. I would work on them an hour here and there to work on these projects. 

On a side note, I mentioned I would like to share the wooden toy I have made with out giving them away.  My wife and I have talked about opening our house up every fifth Saturday for kids to come and play with the toys at our house.  We are going to try for January 29th from 11:00-1:00.  We have a 6 kid limit and we will provide lunch - pizza.  We will not provide transportation.  Please e-mail me your child's name and they will be put in a hat for a drawing.  Drawing will be held on Saturday January 22.  Think of it as free baby sitting.

Friday, January 7, 2011

Beads

I haven't posted this on the my blog even though they have been done more than a year.  This was part of the Christmas presents for the nieces and nephews last year.  I was not happy how the paint on the white and yellow beads kept cracking.  It still does and I am saying "oh well."  I made five sets and I have two extra. 
They were interesting to make.  They are are all out of 8/4 lumber (planed down to 1 1/2")  All the parts were made on the table saw except the cylinders, they are cut dowel.  They were simple to make not so easy to paint.  Maybe I will try Rit fabric dye if I make these again.